Friday, October 3, 2014
Saturday, August 30, 2014
S.S. TWINS
So this is my latest FINISHED project!
This is my neighbors twin boys bedroom.
I absolutely LOVE how it turned out.
I hope my neighbor,and her boys will love it just as much!
Let me walk you through what is going on in here…


This concept for a nautical theme was all my neighbors idea.
She also knew she wanted horizontal stripes.
So her awesome husband got these great blue stripes up.
They would have looked fine as is…. But I talked them into outlining the stripes in rope!
I secured the rope to the walls with thin finishing nails. I am obsessed with how it looks!


Ok, Now for the curtains. I actually had these gray IKEA curtains for a few years and never did anything with them-
Therefore the Twins just inherited free curtains!
For the rod I spray painted the white metal rod that usually comes standard with any window.
I then whipped out the jigsaw-
(Insert Tim "the tool man" Taylor's, series of grunts)
I cut out matching paddles and handles for both sides of the rod- Accented with a little rope, and done!
For the tie backs, I got Boat Cleats at walmart in the sporting goods section for $1.98 each!!!
I love how they look!
So this is my latest FINISHED project!
This is my neighbors twin boys bedroom.
I absolutely LOVE how it turned out.
I hope my neighbor,and her boys will love it just as much!
Let me walk you through what is going on in here…
This concept for a nautical theme was all my neighbors idea.
She also knew she wanted horizontal stripes.
So her awesome husband got these great blue stripes up.
They would have looked fine as is…. But I talked them into outlining the stripes in rope!
I secured the rope to the walls with thin finishing nails. I am obsessed with how it looks!

This was a twin headboard I picked up off a local virtual garage sale for $5.00!
With some red paint and rope accents, it became a great place to store the boys book collection.Therefore the Twins just inherited free curtains!
For the rod I spray painted the white metal rod that usually comes standard with any window.
I then whipped out the jigsaw-
(Insert Tim "the tool man" Taylor's, series of grunts)
I cut out matching paddles and handles for both sides of the rod- Accented with a little rope, and done!
For the tie backs, I got Boat Cleats at walmart in the sporting goods section for $1.98 each!!!
I love how they look!

For the back wall, My neighbor purchased a cube shelf unit.
Now the boys will have plenty of storage for their toys.

 Above the Cubes, I searched google images for old treasure maps, and printed them off the computer. I took a black ink pad and quickly smudged the torn edges. My neighbor already had these frames and she attached the maps to the glass with a glue stick! They look so cool like they are floating!
On the captains wheel, I cheated, and bought it at T.J.Max for $24.oo-
It need a little repainting to match the decor.


The Old wooden buoy was another virtual garage sale find!
Now for the smaller buoy on the dresser…
On the captains wheel, I cheated, and bought it at T.J.Max for $24.oo-
It need a little repainting to match the decor.
My neighbor and I took her husbands lantern from their garage :)
The brass sailboat was a thrift store find, along with the cute Pelican on the dresser.The Old wooden buoy was another virtual garage sale find!
Now for the smaller buoy on the dresser…
I took an empty jug of "S Factor Conditioner" and painted it.
Hey free accessories are awesome!
Hey free accessories are awesome!
I also added to fishing nets from the dollar store.
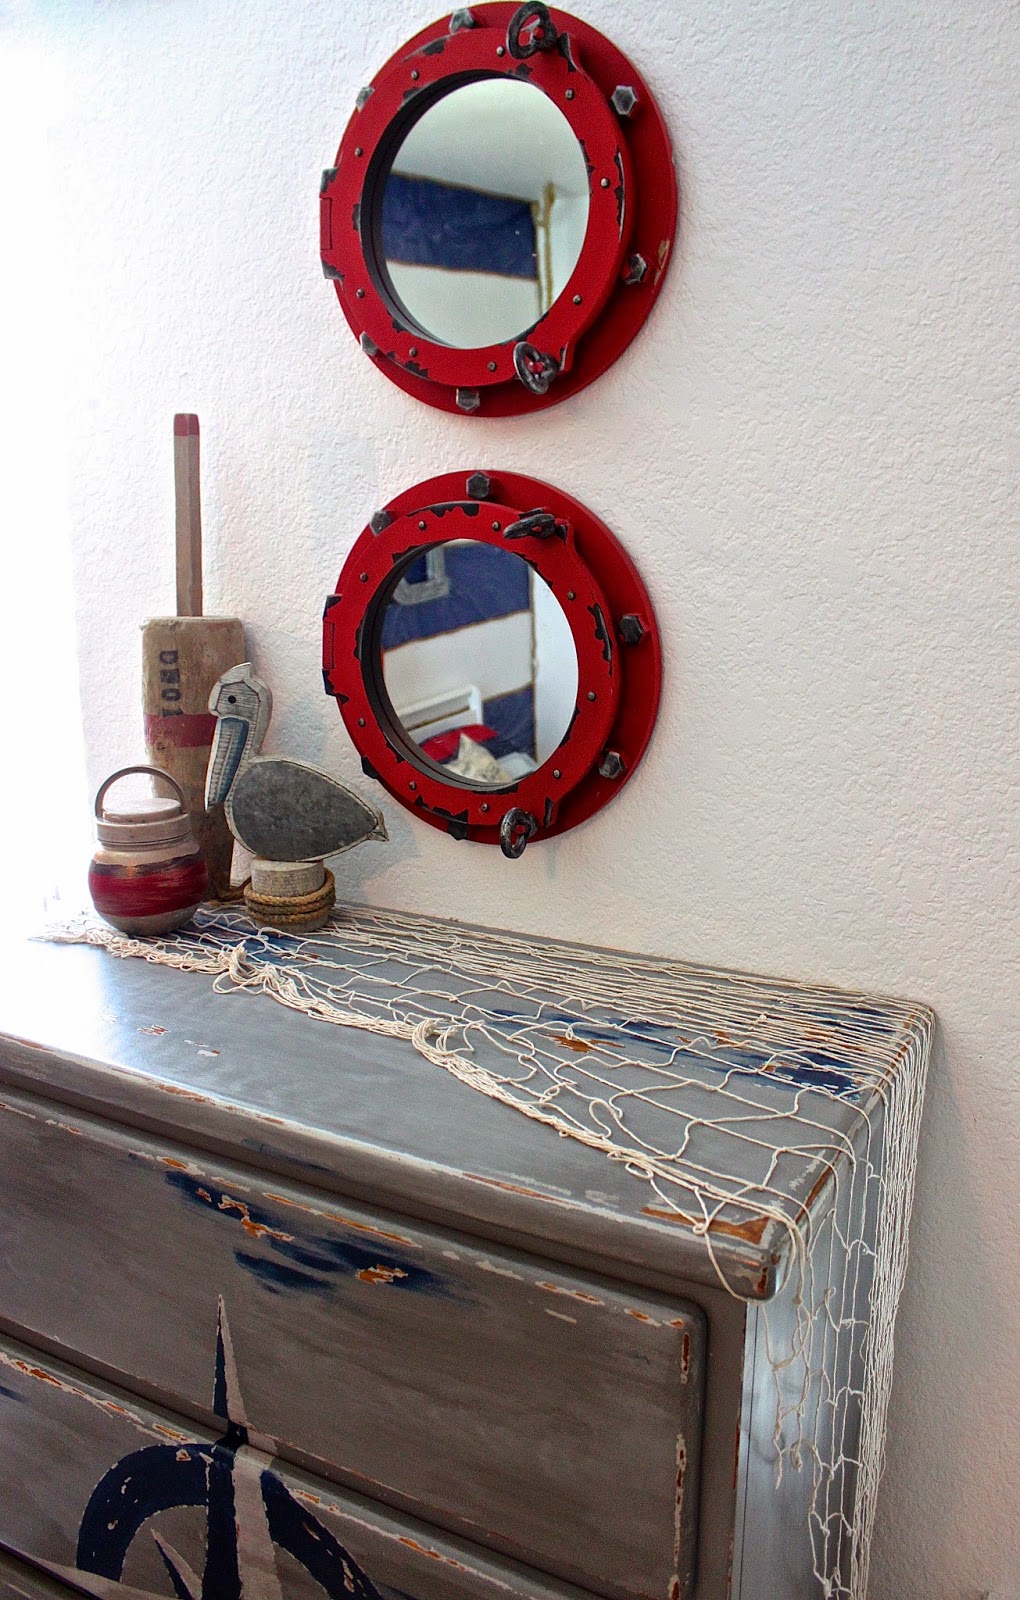
The Port hole mirrors I found at Hobby Lobby for $16.00 each! I bet you can think of some cheaper creative ways to copy these……

The Center Piece of the room is the Pallet Art.
I got this Pallet from a garage sale for $5.00!
I love how there aren't any spaces between the boards-
I then free handed an anchor, and sanded and painted away until I was happy with the look.


My neighbor already had these cardboard letters, so she did a fun distressed two tone gray paint on them.
I love how the color ties in with the curtains.

Don't be afraid to decorate with toys!
**It is for a kids room after all!**


The fun striped toddler bedding came from Target,
and the nautical map pillows were made from dishtowels!
We all know I wasn't gonna use them for cleaning…so why not pillows?!
(the boys grandmother sewed them, FYI)
You can't beat 2 dishtowels for 4.99 instead of paying a fortune for accent pillows-
Think outside the box!
(the boys grandmother sewed them, FYI)
**This AMAZING COMPASS DRESSER**
will be on a future post :)


Here I had these wood frames I got at a Garage sale, and painted red. I then took Blue placemats from the dollar tree and painted simple nautical images, and then trimmed with rope-
I again used the Boat cleats to hang them-
Boat cleats make me happy!
Next, I snuck the boys outside and took some quick pics with some Target $1.00 spot pirate gear. I sent them online to Staples and had engineer prints made.
They were $3.99 for an 18x24 print!
Uhhhh….YES PLEASE!

I had a floral foam ring that I thought I could turn into a life preserver. So I had some spackle I smeared over the whole thing to make it smooth. Then all it needed was some paint and rope accents. When I went to hang it in the room, I couldn't find a good spot….
until I found this spot-
I just attached it to the fan with some fishing line :)


The Center Piece of the room is the Pallet Art.
I got this Pallet from a garage sale for $5.00!
I love how there aren't any spaces between the boards-
I then free handed an anchor, and sanded and painted away until I was happy with the look.
Now for the lights…These are so fun in this room, and super easy! I had 2 really long light cords that came with some paper lanterns I had.
I wrapped the cords in rope and spray painted those metal outdoor flood light covers gold. I added lightbulbs, and it looks like the beds are sitting on a dock somewhere.
My neighbor already had these cardboard letters, so she did a fun distressed two tone gray paint on them.
I love how the color ties in with the curtains.
Don't be afraid to decorate with toys!
**It is for a kids room after all!**

The fun striped toddler bedding came from Target,
and the nautical map pillows were made from dishtowels!
We all know I wasn't gonna use them for cleaning…so why not pillows?!
(the boys grandmother sewed them, FYI)
You can't beat 2 dishtowels for 4.99 instead of paying a fortune for accent pillows-
Think outside the box!
(the boys grandmother sewed them, FYI)
will be on a future post :)
Here I had these wood frames I got at a Garage sale, and painted red. I then took Blue placemats from the dollar tree and painted simple nautical images, and then trimmed with rope-
I again used the Boat cleats to hang them-
Boat cleats make me happy!
Next, I snuck the boys outside and took some quick pics with some Target $1.00 spot pirate gear. I sent them online to Staples and had engineer prints made.
They were $3.99 for an 18x24 print!
Uhhhh….YES PLEASE!
I had a floral foam ring that I thought I could turn into a life preserver. So I had some spackle I smeared over the whole thing to make it smooth. Then all it needed was some paint and rope accents. When I went to hang it in the room, I couldn't find a good spot….
until I found this spot-
I just attached it to the fan with some fishing line :)
Overall, I am so pleased with how "S.S.Twins" turned out!
Enjoy BOYS!
Enjoy BOYS!
Sunday, May 4, 2014
To the homebuilder who chose to install this light fixture
in one of your homes…..
SIR, You deserve a swift punch in the throat!
WTF kind of style were you going for? Were you drunk? Did you misplace your glasses? Is this your idea of a prank?
If so…Well Played Sir, well played!
It's a weird combo of an egg shape with a barrel flair?…
IDK but it had to go ASAP!

Since I am a Cheap Motha (shut ur mouth), I found this decorative lantern
@ Ross- Yes my favorite store :) It was $22.00.
I threw up a little in my mouth because anything over $10.00 and I get light headed.
But I thought for a light fixture it was a bargain!
So off to the house we went to rig up my new light……

I used the existing chain, ceiling mount, and the existing
lighting that was stored inside the "Egg-Barrel."
I did spray paint the candlestick things inside gray, and I dry brushed black paint on the chain and ceiling mount to tie in with the lantern.
And since the top of the lantern was vented already I was able to keep the bottom attached-
Not bad for a quick and easy upgrade-

(If you or ANYONE you know suffers from a homebuilders lighting mistake, it's not too late for help. There are plenty of options out there for you. Consult with Pintrest or maybe a crafty friend. There is still time, don't lose hope.)
Thursday, April 24, 2014
Dr.Seuss
Thing One Thing Two-
Twin BABY SHOWER
My son's teacher was pregnant with twins, and since I was the room mom I decided that the class would give her a surprise shower!
The kids were pumped about keeping this secret, however our teacher had those babies before our scheduled shower.
You will notice on the banner that she "was" due.
It didn't matter- She had the most precious babies and although they were a bit early, they are healthy and happy & home with momma!
So theme…..
I looked all over the web for twin shower ideas, and there are some cute ones!
But I thought that the students would enjoy Dr. Seuss and have more fun with it.
So I started my pintrest searches for decor ideas like we all do-
Found a couple I liked, and added a few of my own-
All CRAZY easy to make and do.
Also I am the most frugal person on the planet so if I can find it at the dollar store….I'm all over it!
First was the fun Whoville looking trees- Easiest thing EVER-
*Pool Noodle ($0.97 each)
*use tape, paper or (extra vinyl i had laying around) to make the stripes (free)
*and tissue poms (1 big pack of red $3.99), I had the other already)
DONE!!!!!

I know this looks like a lot, but when you break it down it's super easy!
*Thing 1 Thing 2 flag banners- scrap fabric I cut into triangles & and printed off the letters from the computer and used a die cutter to make the scalloped edge around each letter. I hung it on fishing line so in case I needed it to hang lower you wouldn't see any unwanted wire or ribbon.I added some scrap shreds of fabric to the end to add more interest.
*backdrop- the turquoise paper…..now this was free because
I borrowed from the teachers workroom-
WITH PERMISSION!
Ya know the giant rolls of paper, well I happily rolled them back up after the shower and put them back in the workroom to be used again- SO THERE! Don't judge me!
*Red polka dot plastic table cloth- (Walmart- $1.99)


Ok… SUPER EASY AGAIN!!!!
(BELOW)
I had a flat stick from the garage and to that I added 1 red poster cut into 3 sizes and adhered them to the stick-
I used some "workroom" paper and drew the outline of the arrows, trying to be as Seussical as possible :)
Now for the fun letters… I did buy these from Jo Ann's.
They were $3.99 for the pack but I couldn't pass them up-
I then stuck the stick into a weighted POPCORN tub (yup) from the dollar store, and put a platter on top of the bucket to hold cupcakes. The red & white stripes on the buckets were perfect, so I just covered where it said "popcorn".
Jo Ann's also had that fun teachers bulletin board scalloped border that I bought and used as well- I trimmed the popcorn buckets with it, and also cut out the characters from it and used it like table confetti.


*The 2 smaller popcorn buckets were weighted and then I placed a clear platter on each. I used more "workroom paper" and instantly 2 more tiers for cupcakes :)
P.S. Brookshires in Celina,Tx made the cupcakes with a 24 hour notice!
They turned out so cute!……I don't BAKE!!!


Next are these Dr. Seuss hats- also @ Jo ann's they came in a package of 24 for 4.99.
I thought the kids would get a kick out of wearing them during the shower, and the teacher was greeted with her own hat when she walked in :)
On the back of each hat ,I used packing tape and taped "PRE-WRAP" on each one.
I tied it on each student like headbands and it worked perfect!
(pre-wrap is what athletes wrap their wrist or ankles with before they actually tape. It comes in a roll and has a stretchy, spongy, sticky feel to it. it will tear away easily so be careful when tying. and it comes in a TON of colors!)
**To the right of the red bucket I took color copies of the
"Cat in a Hat" book and just glued them to poster board. Then folded them to look like the book was on the table.

*Ok- the large Red & Blue plastic buckets that held the drinks were also from the dollar store!
*(and so were the bows)
*another popcorn bucket disguised to hold straws and pom pom dowels left over from a princess party we attended (thanks Carrie)

*Candy to fill the bottle- Dollar store
-The students had to write their guesses next
to their assigned #.
*I also had the students write a message to their teachers new baby twins about why they thought their teacher was going to make such a great mother. That went on the blank pages inside the book "Are you my mother?"

*2 more buckets from the dollar store each one held a Dr. Suess theme blanket for each twin.
The students helped tie the blankets :)
Then i put dowels in the back of each bucket with poster board kites
at the top that thing 1 and thing 2 held.

*These onsies were made with the iron on computer transfer paper.
The onsies were a little pricey for my budget…which was $0
They were $9.00 for 3 onsies- but they were cute-


In the end, I loved the way it all came together!
Wednesday, April 16, 2014
Don't Wine About It!


Ok- Here is a quickie project that I did in 45 min. start to finish-
(including putting the magazines in the holes.)
I Bought this wine rack at a garage sale for $5.00.
I love ANYTHING with a retro vibe!
I thought I would turn it into a towel rack,
but I decided I liked the magazines in there more :)
I didn't sand or prime this because I knew I was going
to scuff it up anyway-
In my spray paint inventory was a new turquoise i have been wanting to use, and now was my chance-
*Spray,
*let it dry,
*sand until you are happy.
I haven't sealed it with wax yet, because I am pondering rubbing some gold on the edges…..
I love the gold accents how they look yummy and distressed-
ughhhh-
should I do it?…… AGHHHHH CRAP!
(pause while I go and rub gold on the rest of this piece)

Ok that took 10 min total!!! DONE!
Glad I added the gold :)
Think of some fun ways to repurpose things:
*I could use this to display my daughter's headbands…
*maybe at a craft station, it could hold different colors of paper
Think outside the box, and stop WINE-ing!
LOVE YOU :)
Tuesday, April 15, 2014
Fake it 'till you make it!
Ok so I am not great at many things but I am great at faking! (just ask my husband!)
I love to do a ton of creative things, and sometimes my approach to certain things might be crazy, but as long as I am happy with the end result that's all that matters!
For example, I LOVE doing makeup! When I was little my Maw Maw (grandmother for you NON-Southern Folk),would let me put make up on her all the time. I can still remember the smell of the cover girl 4 color eyeshadow palette. One of the 4 colors was straight up turquoise!
My Paw Paw would come from the back of the house to refill his 64oz. Circle K mug with a fresh Coke, and was met by his sweet wife.
He would do a double take, pause, and tell her how beautiful she looked. He would then hurry back to the Three Stooges. I suppose so we wouldn't hear him laugh at Maw Maw's new streetwalker makeover.
Point is, I loved doing makeup and even though I might not have known in the beginning what were appropriate colors for a Grandmother, I would learn in time, but until then I was gonna Fake it!
That is my approach to so many things- Decorating, Photography, Crafting, Refinishing Furniture, sewing/hot glueing, etc. So instead of pinning stuff all day……which I do a lot…get up and try it!
If whatever you just did sucked…don't tell anyone and try again until its great!
No one will ever know you sanded and repainted a chair 72 times, they will just see a fabulous chair in your house one day, and you can casually express it was one of your DIY's. Your friends will be green with envy, and you will be so proud of what you accomplished :)

My daughter is on the Left applying lipgloss to her bestie, during our soccer game.
Was I upset she wasn't paying attention to the game?….
Nope!
*If your bestie needs lipgloss drop everything and pucker up!*
That's what real friends do!
#lifelesson
Such a proud moment!
I will post some past makeup jobs that I have done soon, along with some fun techniques and tricks!
Stay tuned!!!
Subscribe to:
Comments (Atom)